Checkout Screen
Checkout Screen
The Checkout screen takes a quote and outputs a booked trip or an error when booking the quote.
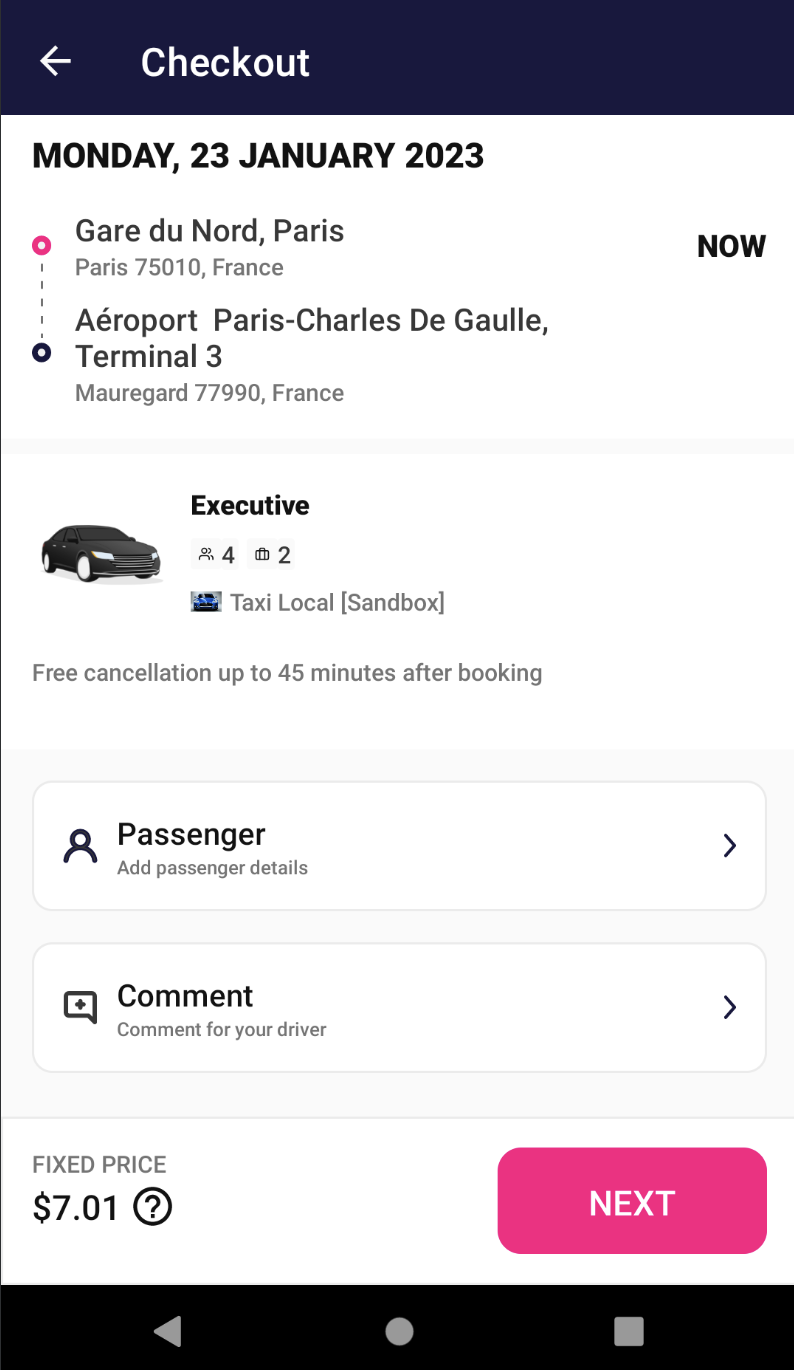
The screen as you open the new checkout
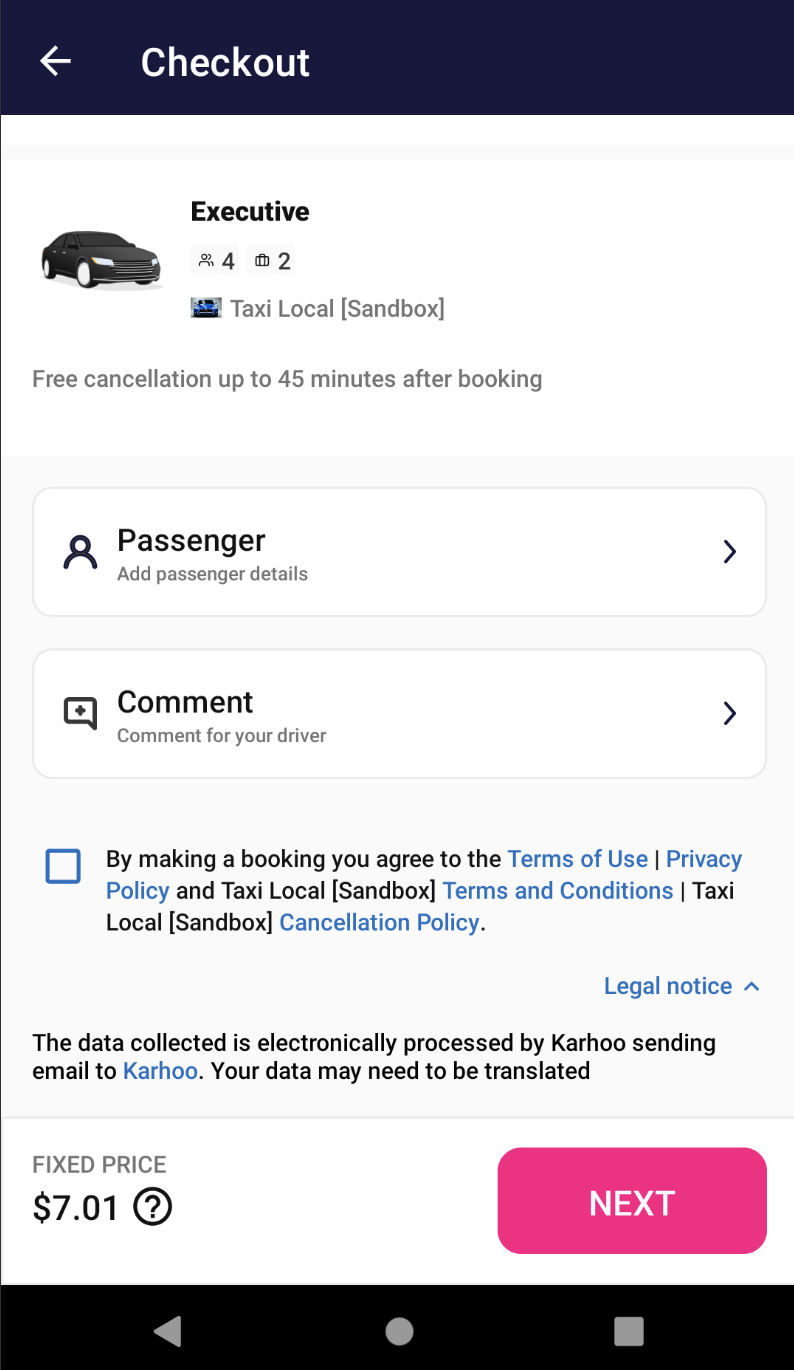
The screen as you scroll down
The new Address component is visible on top of the screen to remind the user the locations that he selected. The text on the right is displaying the NOW text for ASAP bookings and it displays the time of the preebook if not ASAP.
After the Address component we have the Vehicle Details component that shows information about the vehicle type, passenger and luggage capacity, free cancellation info and the fleet name and logo.
Bellow vehicle details is the first Action Cell, the Passenger one. As stated in the subtitle, you should click Passenger to add one. If the passenger is already saved from a previous use, it shows already prefilled and the user can only check if details are correct.
After clicking the Passenger cell, the Passenger Details screen is prompted.
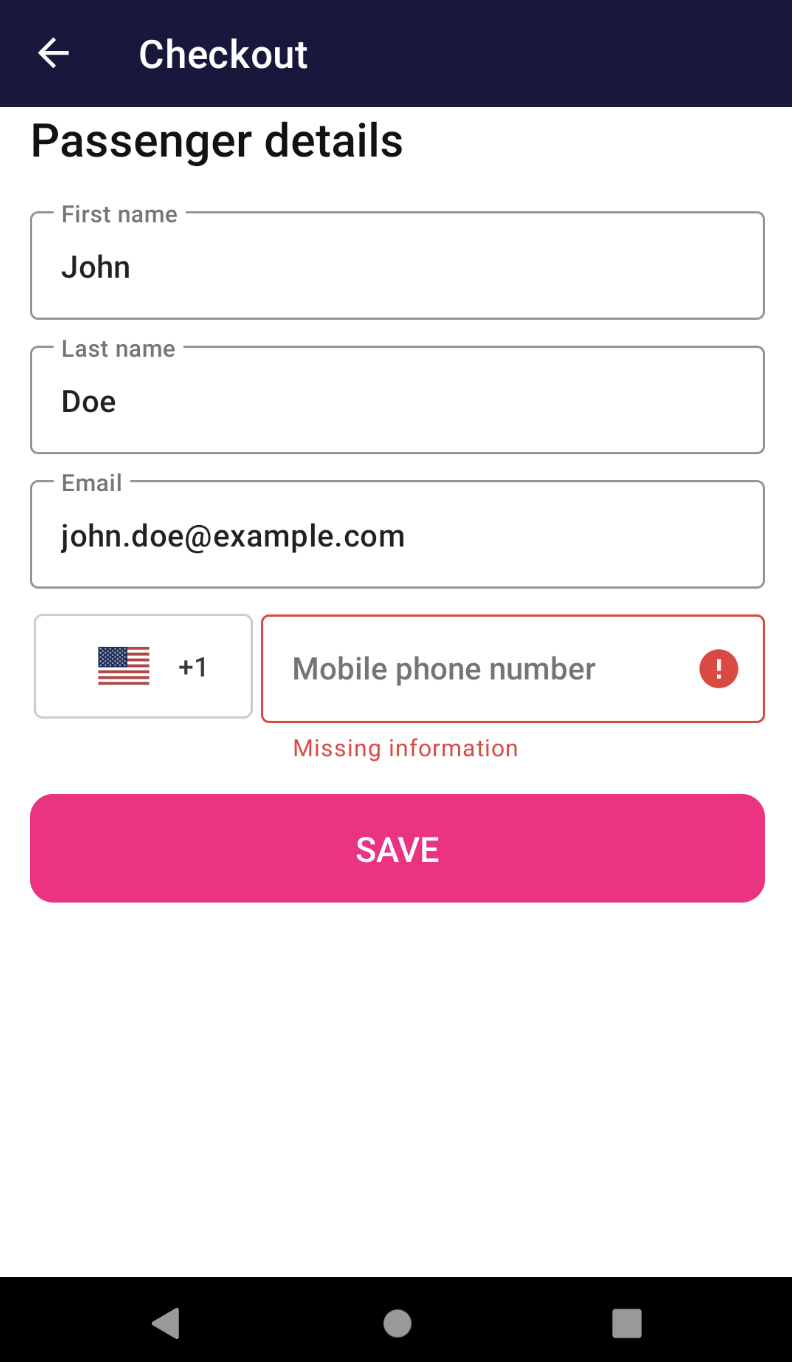
The Checkout passenger screen
As the button states, hitting Next will scroll you down to the Terms and Conditions checkbox if exists. If not, the button will display PAY, the same message will be displayed also after having the checkbox agreed.
On this screen you can also click on Comment to add a comment for the driver and the Comment screen will pop up. You can always edit this comment until the booking is done. You can add up to 3 rows of comments and then it will be replaced with dots.
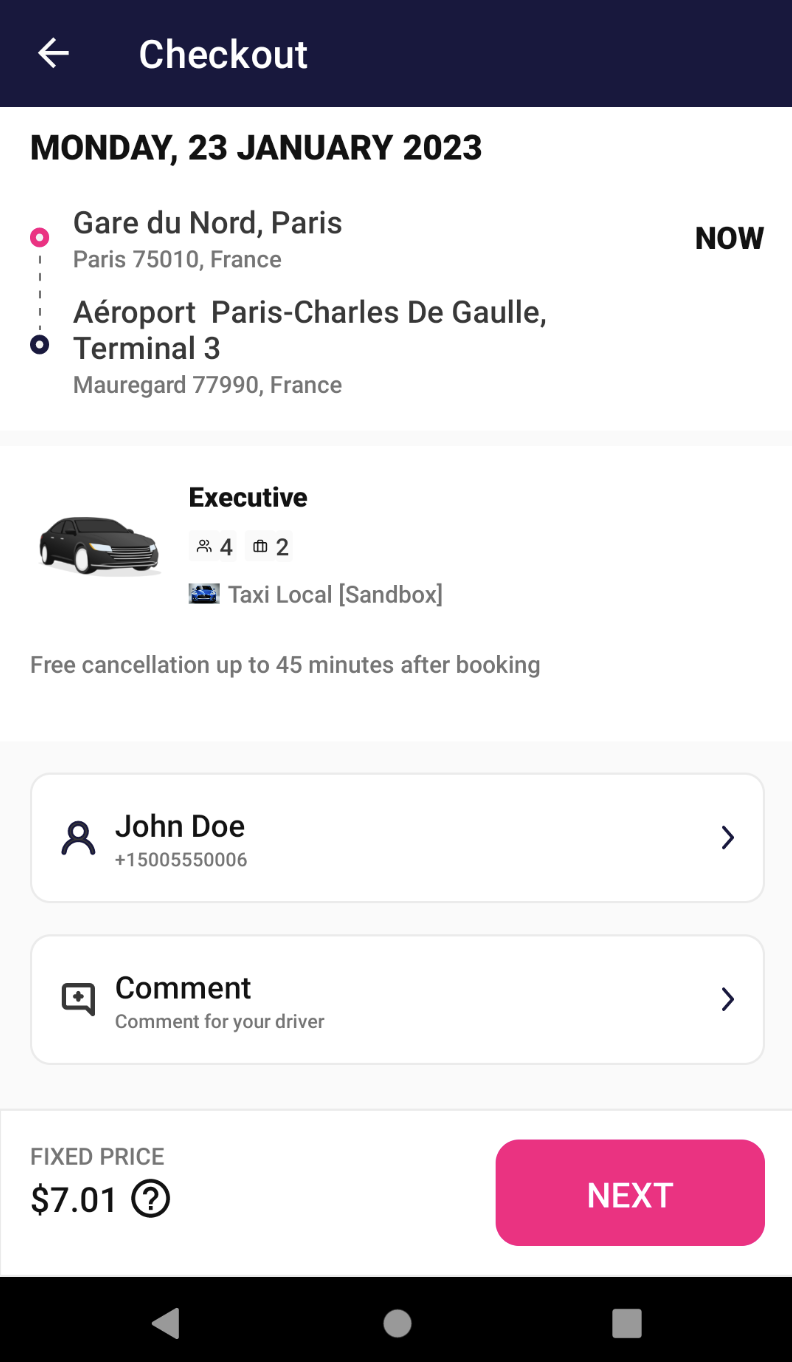
Checkout screen with passenger pre-filled
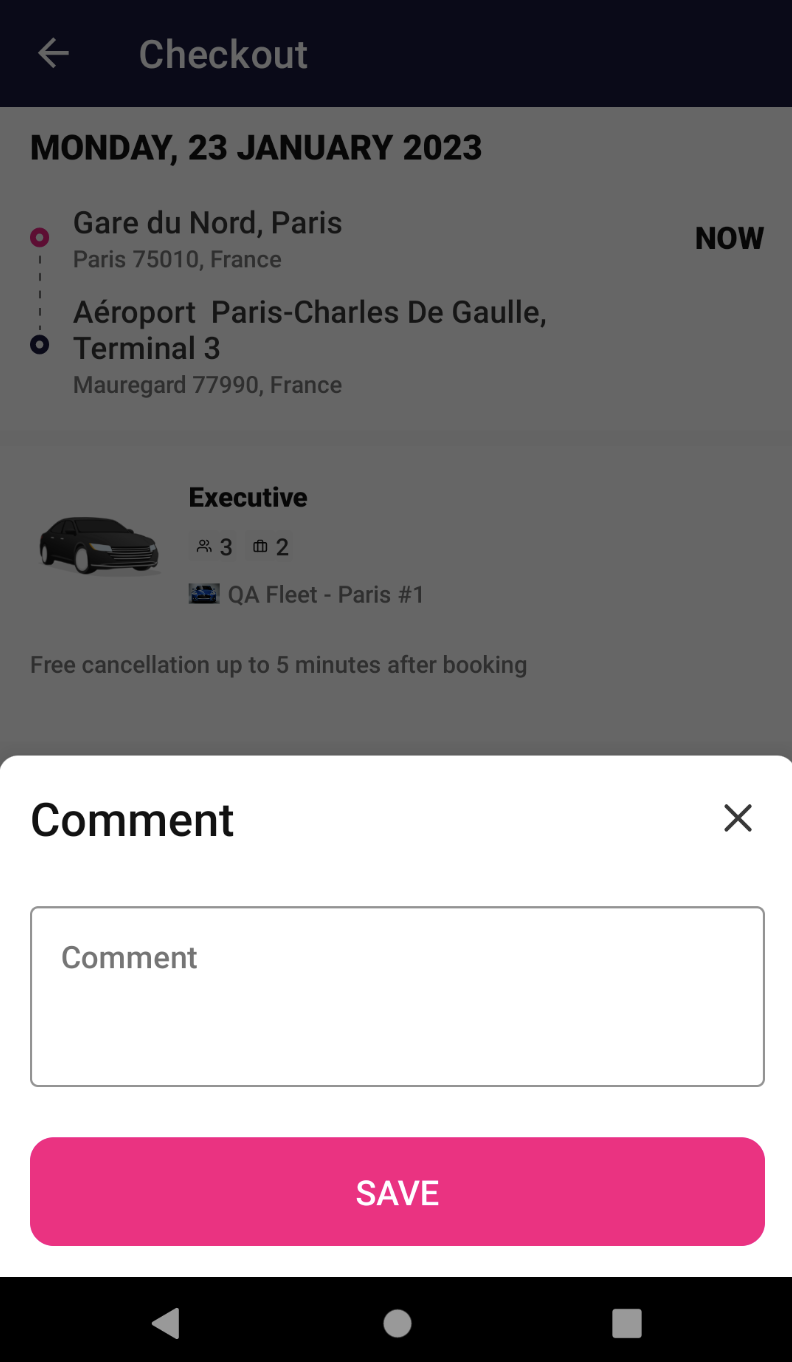
Comments screen
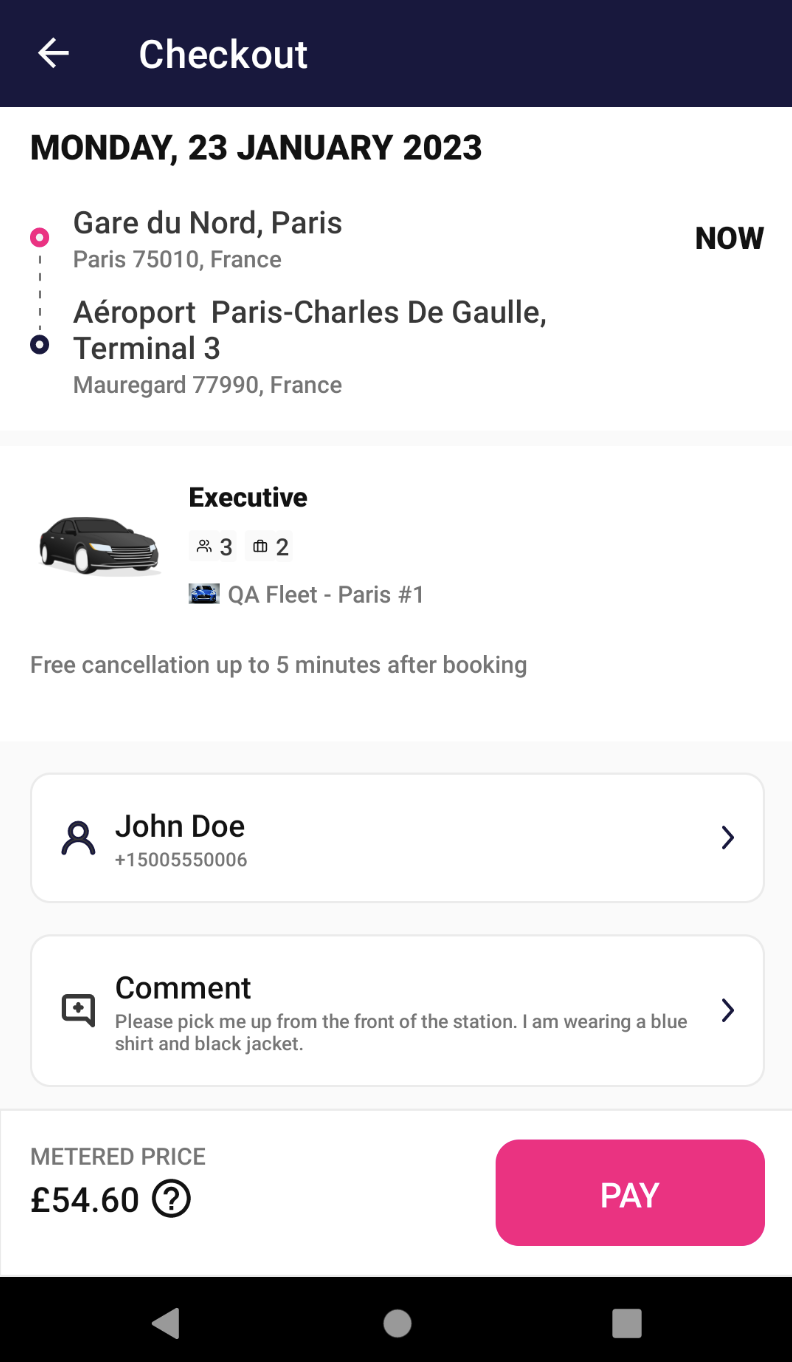
Checkout screen with comments filled
You can always click on the Price overview button, designed as the question mark near the price on the bottom to always check what’s included. Also if there is some Legal Notice to be filled, it will be displayed as an accordion component also at the bottom, but under the price and pay zone.
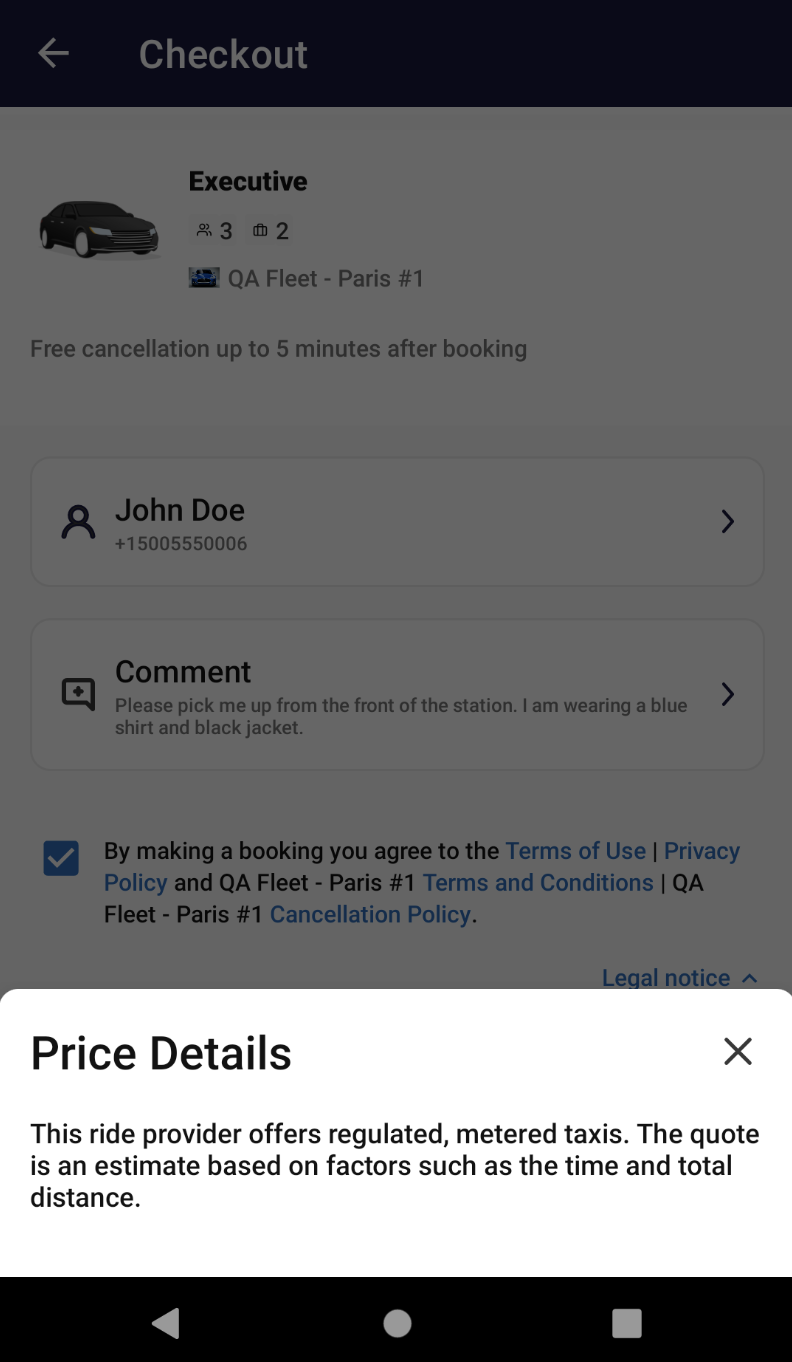
Price details screen
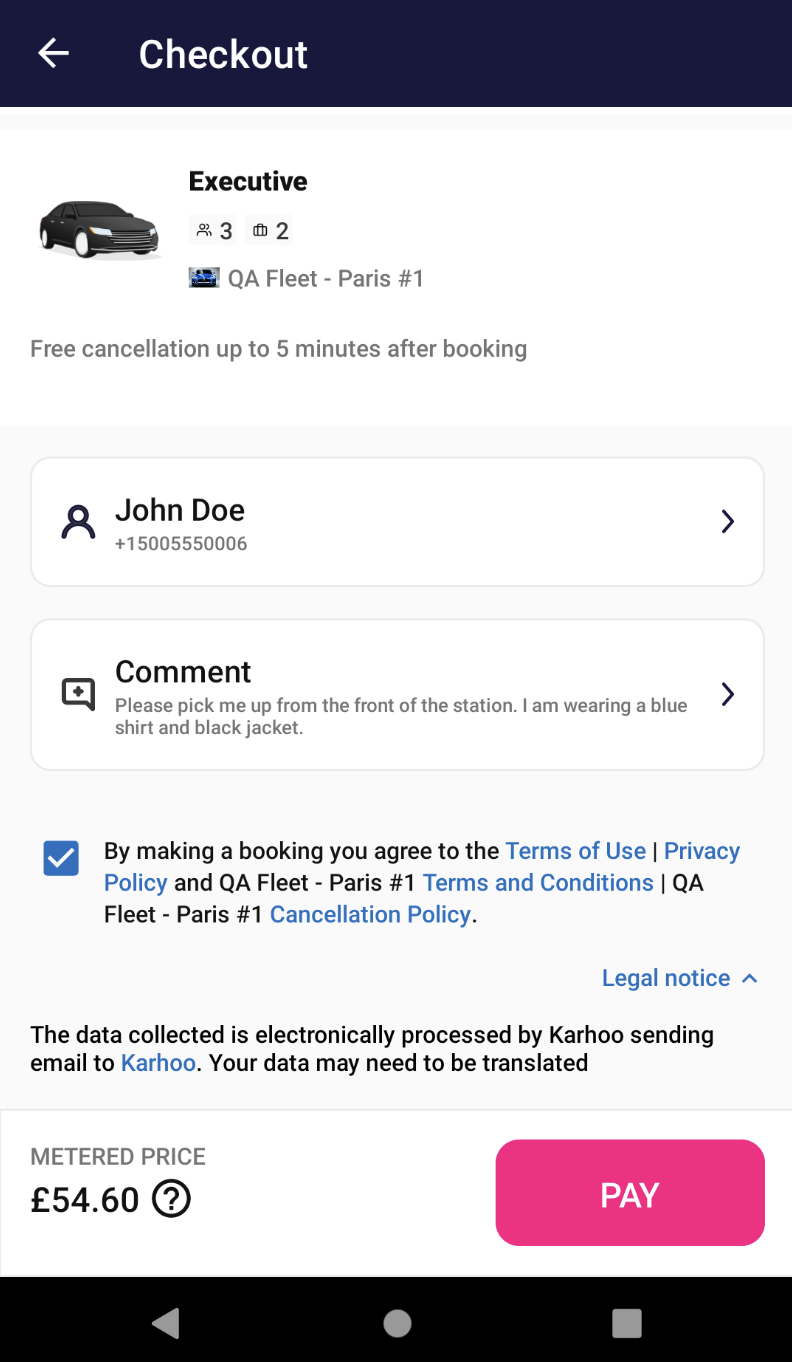
Legal notice component expanded
There are two hidden features that are visible only in certain situations. The components are Airplane number and Train number. The conditions in which those two are visible are to be a preebook ride, the selected fleet to have Flight Tracking or Train Tracking and the pick-up location should be a POI with either an airport or train station.
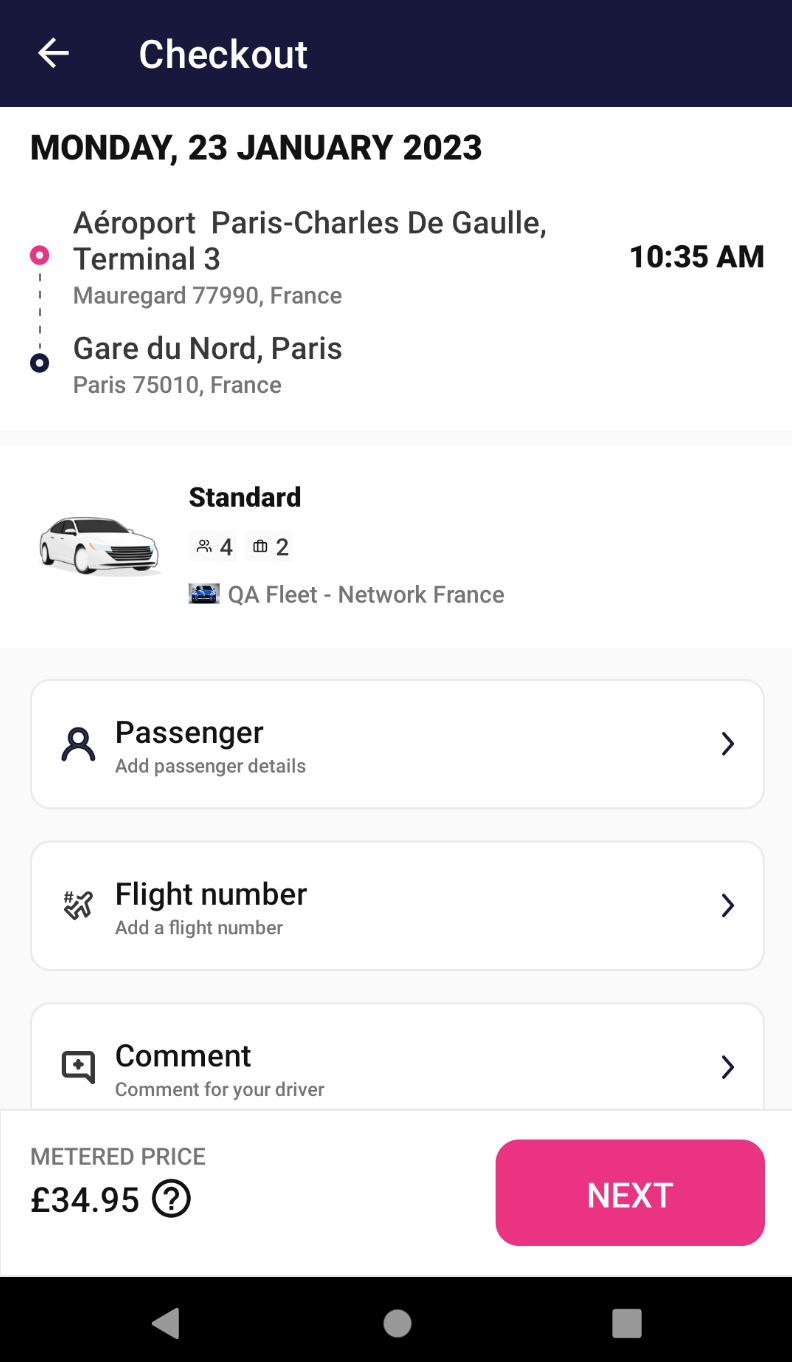
Flight number cell visible
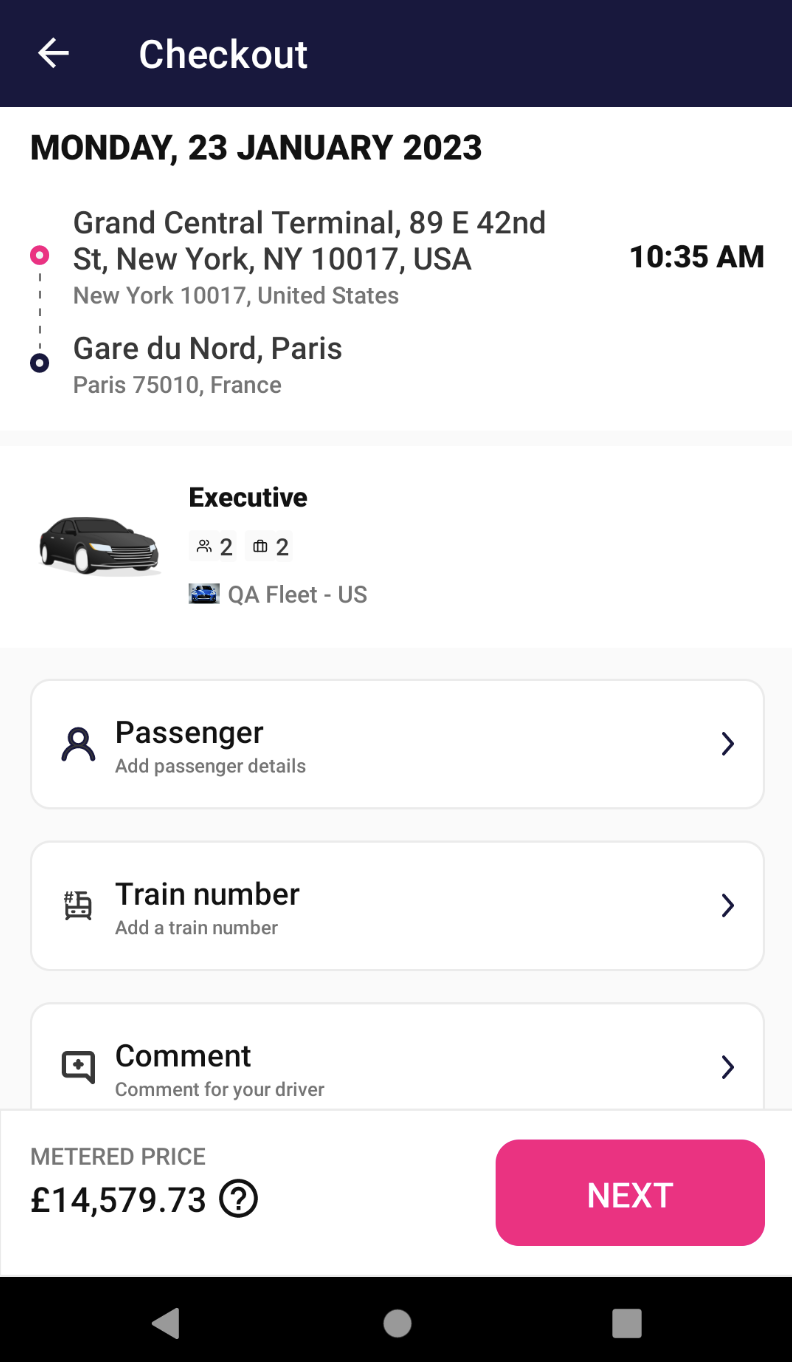
Tran number cell visible
The behavior of those two cells are similar with the comments cell. The difference may be that we don’t allow empty text and only letters and numbers are available to use.
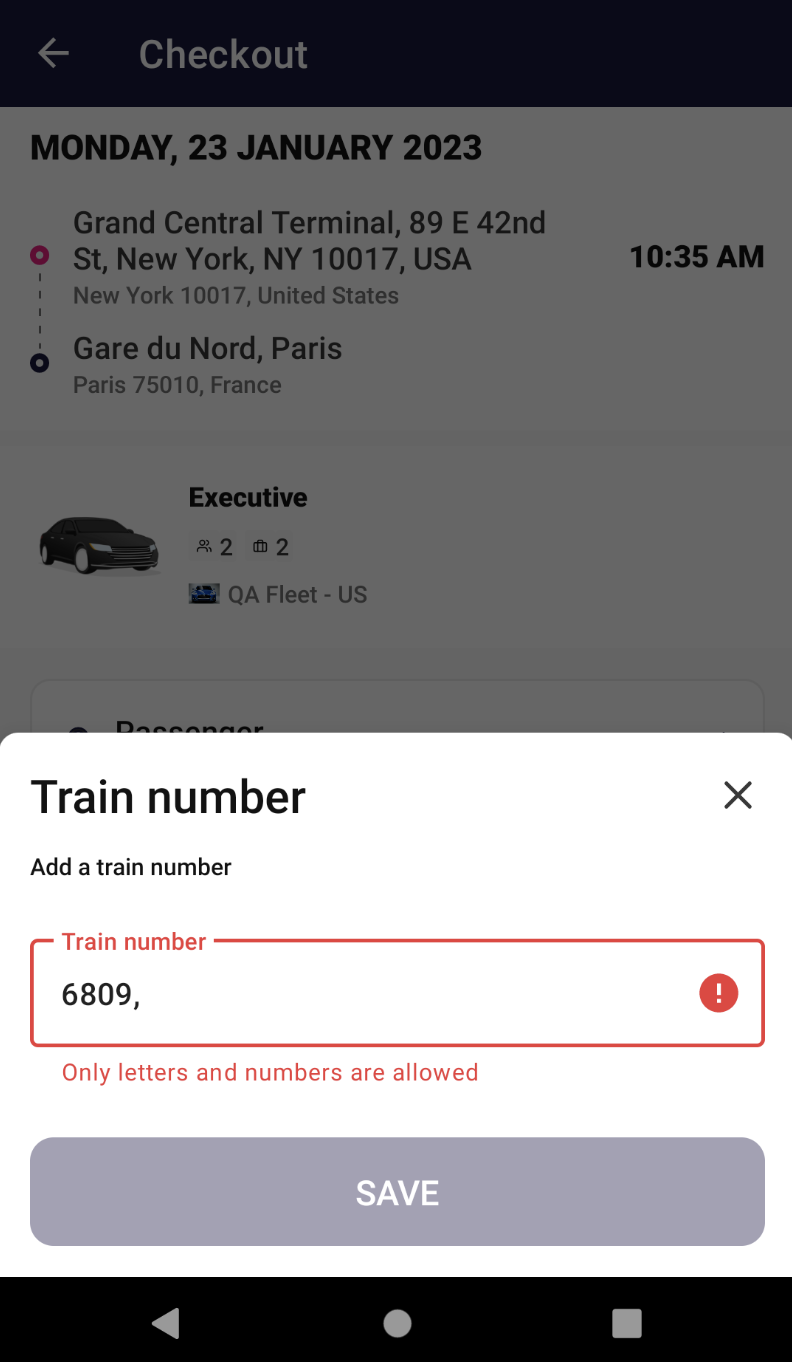
Travel details bottom sheet restrictions
After filling all the details you need as a passenger, you will click the Pay button. The PSP screen will popup, either Adyen or Braintree are supported at the moment, it depends on the partner implementation.
After the payment flow is completed, if the booking is successful, if it was an ASAP ride, the trip allocation screen will proceed. If the ride was a preebook, the booking confirmation screen will pop-up.
The booking confirmation screen will show the address component with the pick-up and the drop-off you selected, the time of the pick-up and the price of the trip. The button "Add to calendar” is optional feature that the partners may set to true in KarhooConfig as useAddToCalendarFeature and may be hidden if false.
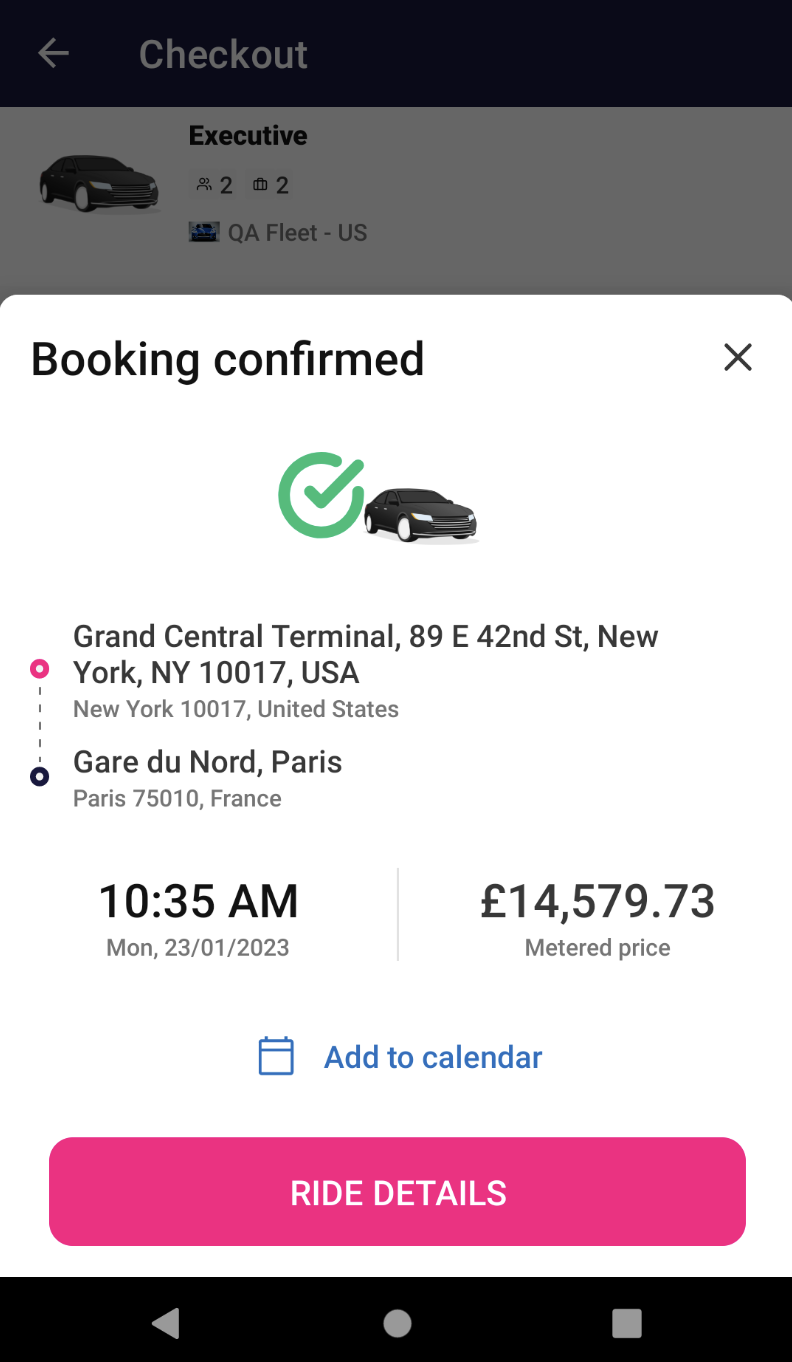
Booking confirmation screen
On some specific cases, if the partner implemented it, we may display the Loyalty component and allow the user to pay with loyalty points available or just earn some more.
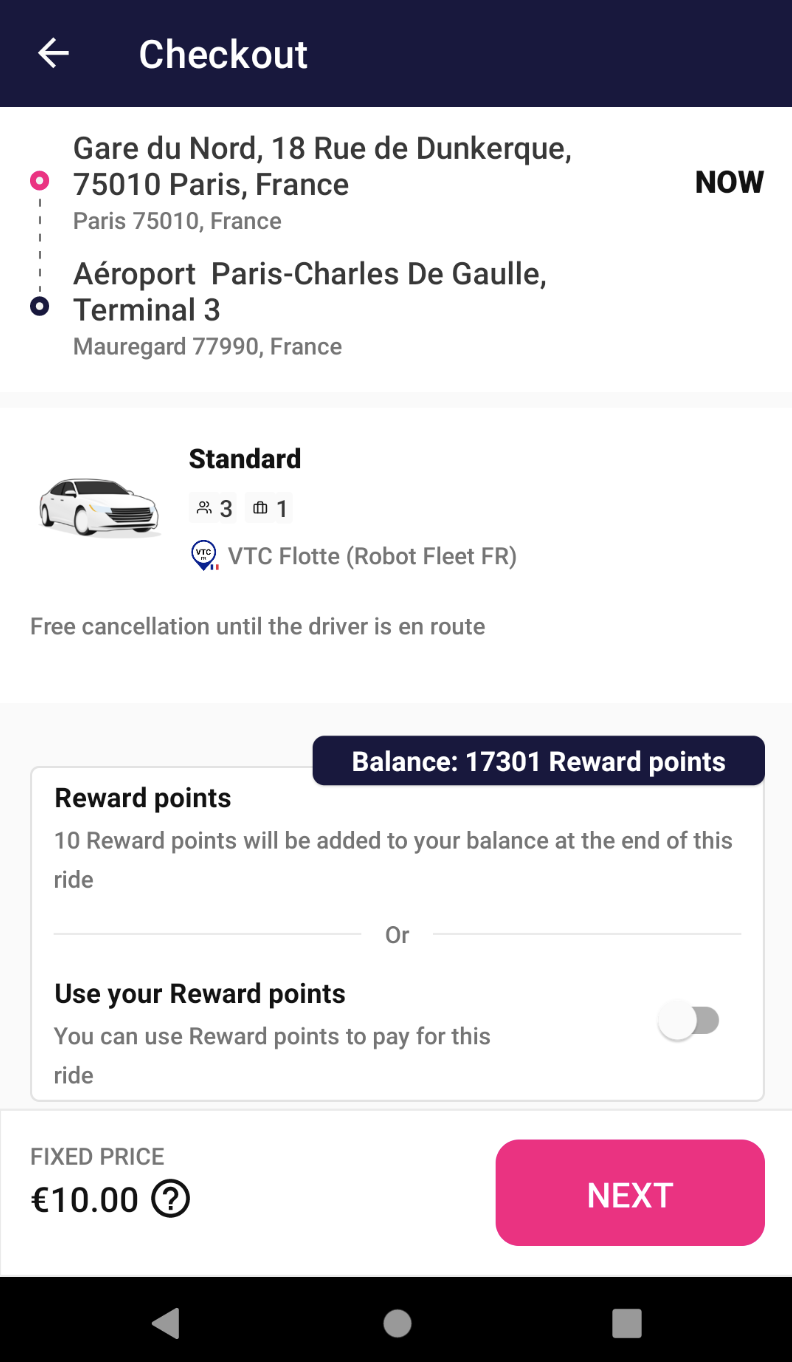
Loyalty view as checkout is opened
Loyalty
The loyalty section is available when Loyalty is enabled for the user. In order to enable the loyalty, you need to integrate with our Loyalty API. This would allow the users to earn or burn loyalty points from their balance after completing taxi rides with Karhoo.
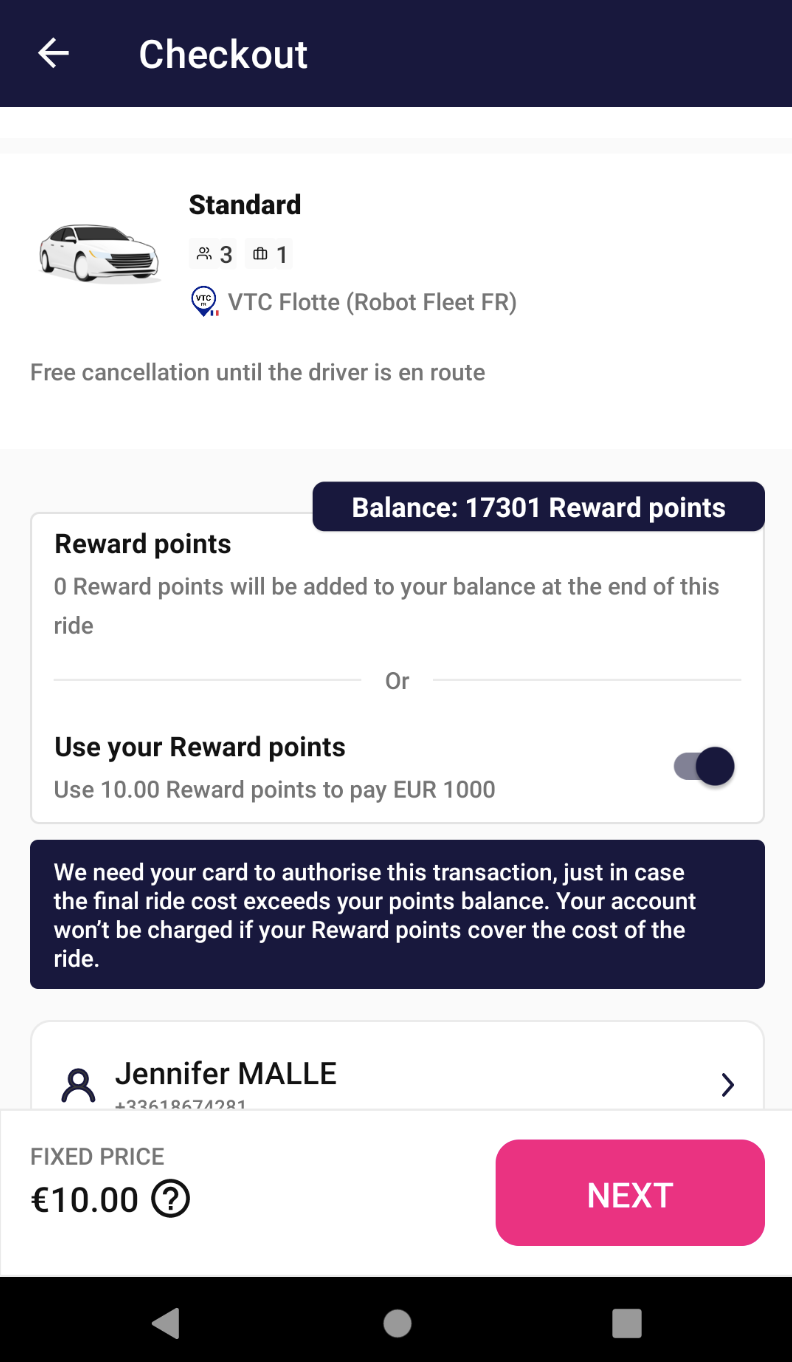
Android Checkout Component with all sections expanded
The Checkout is accessible as an iOS ViewController / Android Activity to automatically handle the presentation, dismissal and handling of the payment flow.
// Create a coordinator using your navigation stack. If no navigationController provided, the coordinator will create it's own navigation stack.
let checkoutCoordinator =  KarhooUI()
			.screens()
			.checkout()
			.buildCheckoutCoordinator(
            navigationController: yourNavigationControllerIfNeeded,
            quote: quote,
            journeyDetails: journeyDetails,
            bookingMetadata: nil,
            callback: { [weak self] checkoutResult in
                switch checkoutResult {
                case completed(let successResult):
                    // handle result
                case cancelled(let isCancelledByUser):
                    // handle canceled by user
                case failed(let error):
                    // handle failure
                }
            }
        )

// If you used your own navigation controller
checkoutCoordinator.start()

// If you are not using your own navigation controller, please use modal presentation. Feel free to customise it however you need.
guard let checkoutScreen = checkoutCoordinator.navigationController else { return }
checkoutScreen.modalPresentationStyle = .fullScreen
yourViewController.present(checkoutScreen, animated: true)
private var passengerDetails: PassengerDetails? = null
private var bookingComments: String? = ""
private var bookingMetadata: HashMap<String, String>? = null
private var bookingStatus: BookingStatus(pickupLocationInfo, destinationLocationInfo, date)

val builder = CheckoutActivity.Builder()
                            .quote(quote)
                            .bookingMetadata(bookingMetadata)
                            .bookingStatus(bookingStatus)

passengerDetails?.let {
  builder.passengerDetails(it)
}

bookingComments?.let {
  builder.comments(it)
}

startActivityForResult(builder.build(this), REQ_CODE_BOOKING_REQUEST_ACTIVITY)
Payment flow
The payment flow is just as you expected it to be, simple and straightforward.
In the Checkout Screen you should first fill in the required fields, the main passenger details and the T&Cs checkbox if needed and then optional fields like comments, flight number or use the loyalty points.
When you are ready to pay, the highlighted button will display the words "NEXT".
After tapping it, the required information regarding the payment will be required to fill in or just select an already saved card.
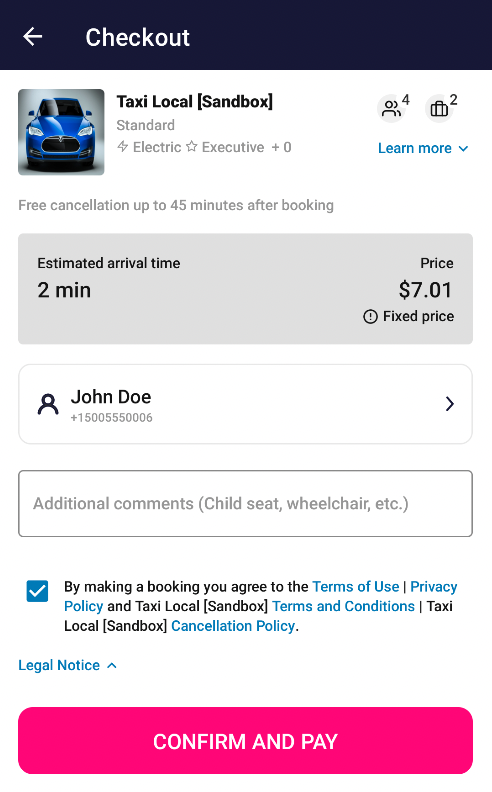
Booking ready to be confirmed
The currently Payment Providers that we support are Braintree and Adyen. To implement one or another it's a matter of choosing the right uisdk library. If you choose the Braintree provider, the payment flow will go as follows in the next pictures.
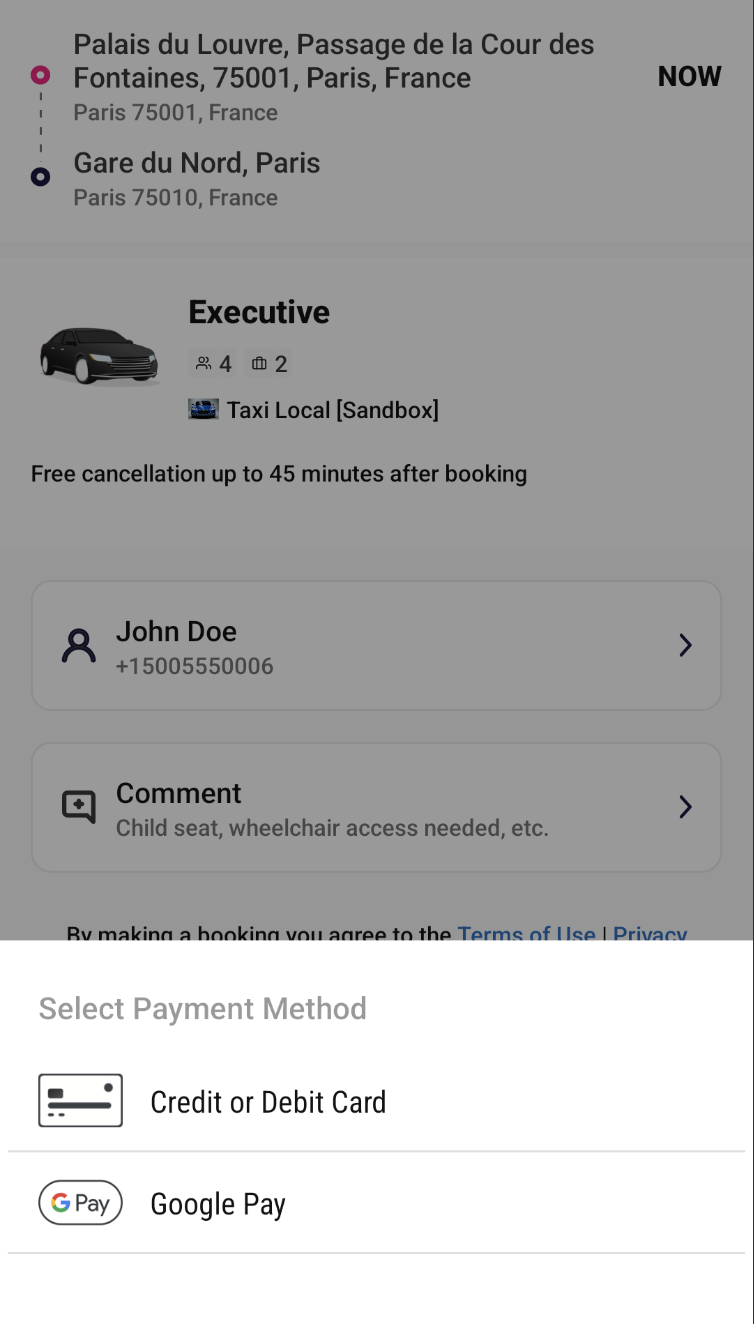
After hitting Pay button, the methods screen pops up
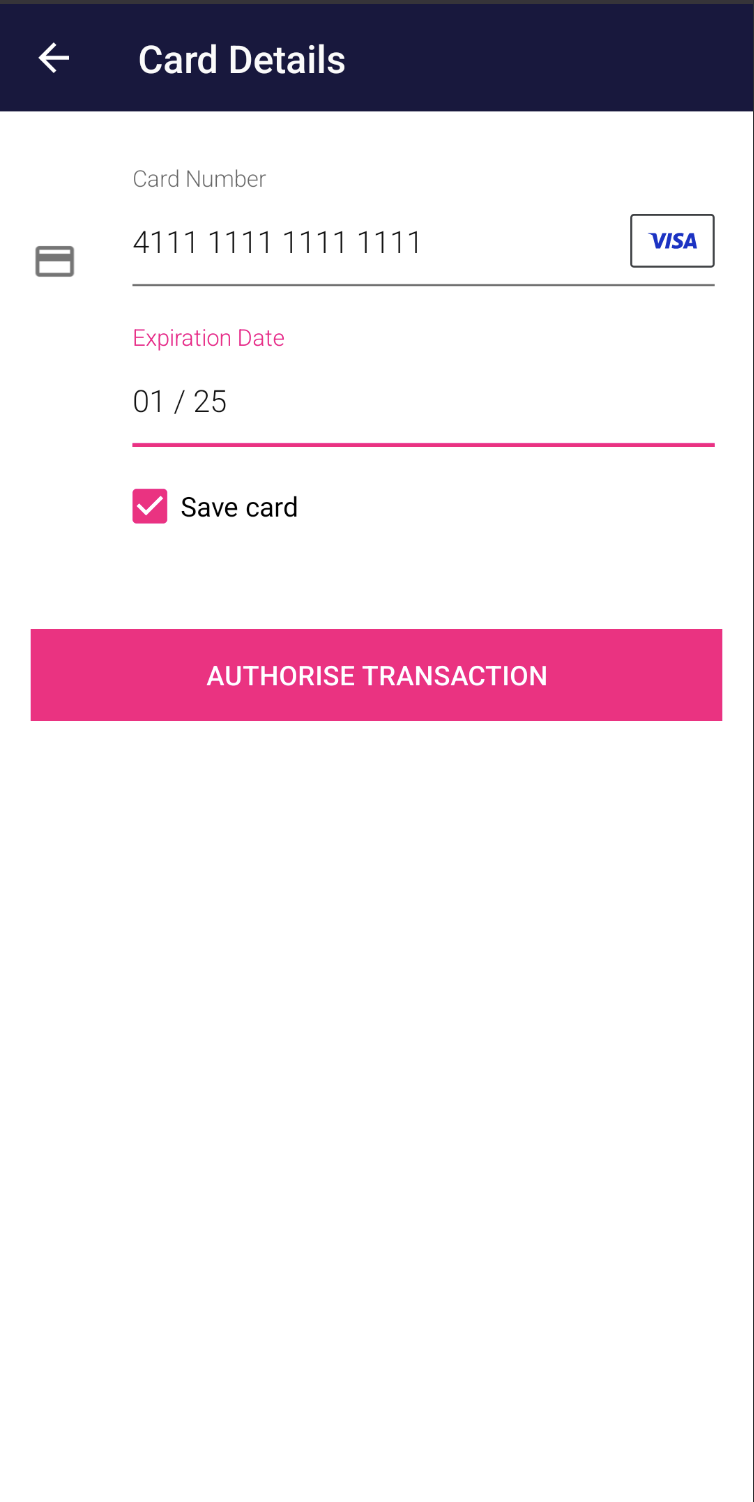
Adding a card is very easy and you also have the option to save or not the card
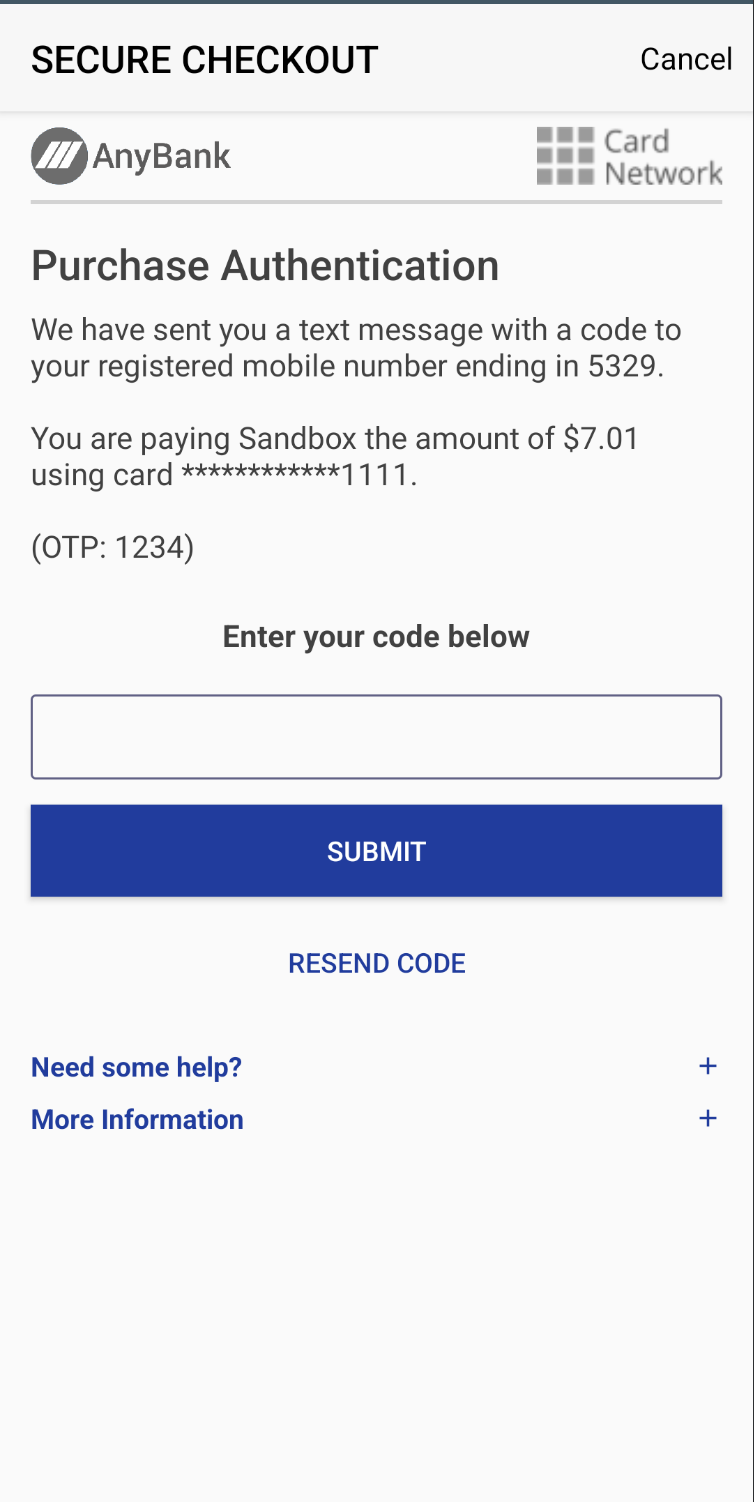
The last step in payment flow is 3DS which is currently enforced to version 2.
iOS Sample
Payment flow handling
The checkout component requires a URL scheme to be set for the SDK to fully manage 3DSecure payment flows.
We've added a summary below for convenience. For more details please consult the aforementioned guides.
---- BraintreeURLTypeContext.swift -----
import Foundation

struct BraintreeURLTypeContext {

    static func currentScheme() -> String {
        guard let bundleId = Bundle.main.bundleIdentifier else {
            return ""
        }

        return "\(bundleId).braintree"
    }
}
import Braintree
import Adyen

class AppDelegate: UIResponder, UIApplicationDelegate {

    func application(_ application: UIApplication,
                     didFinishLaunchingWithOptions launchOptions: [UIApplication.LaunchOptionsKey: Any]?) -> Bool {
        // ...
        BTAppContextSwitcher.setReturnURLScheme(urlScheme)

        return true
    }

    func application(_ app: UIApplication, open url: URL, options: [UIApplication.OpenURLOptionsKey: Any]) -> Bool {
        if url.scheme?.localizedCaseInsensitiveCompare(BraintreeURLTypeContext.currentScheme()) == .orderedSame {
            return BTAppContextSwitcher.handleOpenURL(url)
        }

      	let adyenThreeDSecureUtils = AdyenThreeDSecureUtils()
        if url.scheme?.localizedCaseInsensitiveCompare(adyenThreeDSecureUtils.current3DSReturnUrlScheme) == .orderedSame {
            return RedirectComponent.applicationDidOpen(from: url)
        }

        return false
    }
}
Please replace the
"codes": mentioned below with your application Bundle ID. If you have a sandbox build type, you need to include add the URL types for sandbox as well.
---- info.plist -----
<key>CFBundleURLTypes</key>
	<array>
    <dict>
        <key>CFBundleTypeRole</key>
        <string>Editor</string>
        <key>CFBundleURLName</key>
        <string></string>
        <key>CFBundleURLSchemes</key>
        <array>
          <string>[BUNDLE_ID]</string>
        </array>
      </dict>
      <dict>
        <key>CFBundleTypeRole</key>
        <string>Editor</string>
        <key>CFBundleURLName</key>
        <string>App-Payments-AppStore</string>
        <key>CFBundleURLSchemes</key>
        <array>
          <string>[BUNDLE_ID].braintree</string>
        </array>
      </dict>
      <dict>
        <key>CFBundleTypeRole</key>
        <string>Viewer</string>
        <key>CFBundleURLName</key>
        <string>App-Payments-Adyen-AppStore</string>
        <key>CFBundleURLSchemes</key>
        <array>
          <string>[BUNDLE_ID].adyen</string>
        </array>
		</dict>
	</array>
</key>
Android Sample
When an authenticated user selects a quote, they are then taken to the checkout screen which enables them to change passenger details, enable loyalty earning or burning, see the capabillities of a ride, add or update their payment details and end up by booking the ride.
The Checkout Activity can be launched independently from the Booking Activity. In order to launch it succesfully, a valid Quote is required for the component to work, the rest of the parameters are optional.
quote: Quote | The activity will take the quote object and use this to prepopulate eta, pricing and vehicle details fields |
bookingMetadata: HashMap<String, String>? | If an metadata map is passed in the activity, it will be used as part of the Booking API meta data |
bookingInfo: BookingInfo | By passing booking status into the Booking activity it will automatically prefill the origin, destination and date of the desired trip. |
passengerDetails: PassengerDetails | If a passenger is added, then it will be used to prefill the passenger details in the booking request component |
comments: String | By passing comments into the Checkout Component it will automatically prefill the comments of the desired trip. |
validityDeadlineTimestamp: Long | Sets the validity timestamp of the quote When validity of the quote is expired, a popup will be shown to the user to notify him |
The Checkout Activity can be launched similar to the Booking Activity, containing a builder which can handle the above params
// launching for primary flow
val builder = CheckoutActivity.Builder()
                            .quote(actions.quote)
                            .bookingMetadata(bookingMetadata)
                            .passengerDetails(passengerDetails)
                            .comments(bookingComments)
                            .bookingInfo(BookingInfo(pickup, destination, date))
                            .currentValidityDeadlineTimestamp(ts)

// launching for callback example
startActivityForResult(builder.build(this), REQ_CODE_BOOKING_REQUEST_ACTIVITY)
When an error occurs in the Checkout Component, the activity will be finished with a result containing an error code or string
In order to catch the error result, override onActivityResult in the calling activity and listen for BOOKING_CHECKOUT_ERROR result code
/**
     * Method used for finishing up the booking request activity with an error
     * The activity which launches the BookingRequestActivity should handle the error result
     * under BOOKING_REQUEST_ERROR (result code 10) and act accordingly
     * @param error reason for closing the BookingRequestActivity
     */
    private fun finishWithError(error: String) {
        val data = Intent()
        data.putExtra(BOOKING_CHECKOUT_ERROR_KEY, error)
        setResult(BOOKING_CHECKOUT_ERROR, data)
        finish()
    }
When the Checkout Component successfully books a trip, the resulting tripId will be available on the returning's intent extras of CheckoutActivity.BOOKING_CHECKOUT_PREBOOK_TRIP_INFO_KEY
if (resultCode == Activity.RESULT_OK && requestCode == REQ_CODE_BOOKING_REQUEST_ACTIVITY) {
            if (data?.hasExtra(CheckoutActivity.BOOKING_CHECKOUT_PREBOOK_TRIP_INFO_KEY) == true) {
                //In case of prebook,the trip is instantly booked. Show a confirmation
                showPrebookConfirmationDialog(data)
            } else {
                //Send the data to the trip allocation widget
          tripAllocationWidget.onActivityResult(requestCode, resultCode, data)
            }
        }
Updated almost 3 years ago
